


To install RAM, power down and unplug the PC, ground yourself, open the case, press the new sticks firmly into the correct slots until the latches click, then boot and confirm the capacity in the BIOS. The whole job usually takes 10 to 15 minutes once you know which slots to use.
Most of the risk in this job is not the physical seating, it is compatibility and slot order. Get those right and the upgrade is one of the simplest you can make to a desktop. I based this guide on manufacturer manuals and spec sheets, published standards such as ATX, and widely documented PC building practice.
When to Install RAM and Why It Matters
You should install more RAM when your system runs out of memory during normal work. The signs are familiar: many browser tabs slow everything down, switching between apps stutters, and a game or editing project hitches when you load a new scene. Adding capacity gives those workloads room to breathe.
A second reason is speed. If your motherboard supports faster memory than the sticks you own, a matched kit can help, but only within what the board and CPU officially support. Check the motherboard manual and the CPU spec sheet before you buy, because support varies by platform and generation.
You can skip this upgrade if your current capacity already covers your heaviest tasks with headroom. Doubling RAM you never fill does nothing for performance. If you are building fresh and choosing a kit, my roundup of DDR5 RAM for gaming covers what to compare before you commit.
One platform note: DDR5 and DDR4 are not interchangeable, and the notch positions differ. Laptops and many small-form-factor systems use SO-DIMMs instead of full-size DIMMs. Confirm the memory type and form factor in your manual before ordering anything. Compact boards usually have only two memory slots, so if you are planning a small build, see my roundup of Mini-ITX motherboards for small builds before you pick a kit.
What You Need Before You Start
Gather everything first so you are not hunting for tools with the case open. You need very little, but the right preparation prevents most problems.
- The correct memory kit. Match the type (DDR4 or DDR5), form factor (DIMM or SO-DIMM), and capacity to your motherboard manual. A matched pair or kit is safer than mixing single sticks.
- The motherboard manual. It lists supported slots, the correct slot order for two or four sticks, and any population rules. Follow it over any general advice.
- A Phillips screwdriver. Most cases use thumbscrews, but a screwdriver helps with side panels and some cooler clearances.
- An anti-static wrist strap (optional but useful). If you do not have one, touch bare metal on the case chassis before handling the sticks.
- A clean, well-lit work surface. A table at standing height beats a carpeted floor, and good light helps you see the slot latches.
Before opening anything, shut down the operating system, switch off the power supply, and unplug the power cable from the wall. Hold the power button for a few seconds to drain residual power. Then ground yourself by touching bare metal on the case, or clip on an anti-static wrist strap.
[cog_pick asin=”B0H4LSTG1N” guide=”1293″]
How to Install RAM Step by Step
Work slowly and keep the sticks by their edges. The contacts and the small chips on the module are the parts you do not want to touch.
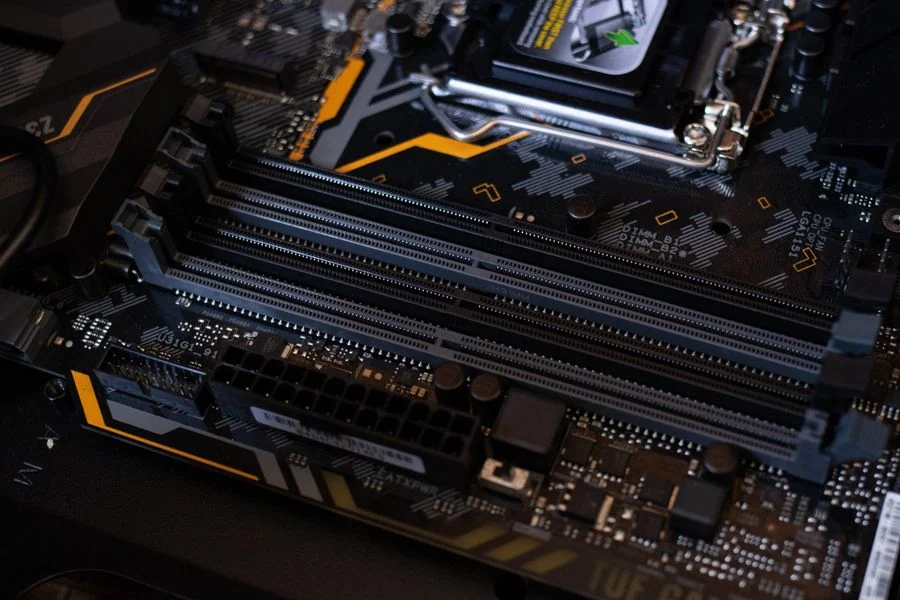
- Open the case and locate the memory slots. Remove the side panel your case manual specifies. The DIMM slots sit next to the CPU socket, usually four in a row, with latches or clips at one or both ends.
- Check the slot order in your manual. For two sticks on a four-slot board, the manual typically points to a specific pair of slots, often the second and fourth from the CPU. Some boards prefer a different pairing, so read the label or table rather than guessing.
- Open the retaining latches. Push the plastic clips at each end of the slot outward and down until they sit flat. On boards with a single latch, only one end moves.
- Align the notch. Look at the stick and the slot: a notch near the middle of the contact edge must line up with a key in the slot. The stick only fits one way. If it does not drop in easily, you have it reversed, so flip it rather than forcing it.
- Seat the stick firmly. Hold the module by its ends, set it into the slot, and press straight down with even pressure on both sides. You should feel the latches snap up and hear a click. The gold contacts should be almost invisible once seated.
- Repeat for the remaining sticks. Install them one at a time and confirm each is fully seated before moving on.
- Close the case and reconnect power. Refit the side panel, plug the power cable back in, and switch the PSU on.
- Boot and confirm the capacity. Enter the BIOS or UEFI setup with the key your motherboard manual lists, and check that the total memory matches what you installed. If the board does not detect the full amount, reseat the sticks before troubleshooting anything else.
On first boot, the system may pause for a memory training cycle, which is normal on DDR5 boards. If you see a memory error or the board fails to post, power down and reseat each stick. Running a memory test from a bootable tool afterward is a reasonable final check.
| Situation | What to do |
|---|---|
| Two sticks on a four-slot board | Use the slot pair named in the motherboard manual, commonly the second and fourth slots from the CPU |
| Four sticks on a four-slot board | Fill all slots, but expect the board to run them at a lower supported speed than a two-stick kit |
| One stick only | Use the slot the manual specifies for single-module operation |
| Mixed sticks from different kits | Expect compatibility problems; a matched kit is the safer choice |
Common Mistakes to Avoid
- Forcing a stick that will not seat. The notch makes the orientation obvious, and pressing hard on a reversed module can bend contacts or crack the slot. Flip it and try again with light pressure.
- Ignoring the manual's slot order. Putting two sticks in adjacent slots when the board wants a specific pair can leave you in single-channel mode or cause a no-post. The manual's population table exists for a reason.
- Skipping the power-down and grounding steps. Working on a live system or without discharging static risks damage to the board and the modules. Shut down, switch off the PSU, unplug, and touch bare metal first.
- Mixing memory types or capacities carelessly. DDR4 will not fit a DDR5 slot, and mismatched sticks can refuse to run at their rated speed. Buy a matched kit when you can.
- Assuming a BIOS update fixes everything. A BIOS update can improve memory compatibility, but it should never be interrupted, and it is not a substitute for correct seating and slot order.
When to Call a Professional
Most desktop RAM installs are straightforward, but a few situations justify handing the job to a technician. If your system is a sealed all-in-one, a laptop with soldered memory, or a prebuilt with a warranty seal you do not want to break, check the manufacturer's terms first. If you are still deciding between building and buying, my roundup of prebuilt gaming PCs is a good place to compare complete systems.
Also stop and get help if a slot looks damaged, if a latch has snapped, or if the board still fails to detect memory after you have reseated the sticks and confirmed compatibility. For warranty questions, follow the manufacturer's terms rather than improvising.
Frequently Asked Questions
Do I need to unplug the PC before installing RAM?
Unplugging is the correct step. Shut down the operating system, switch off the power supply, and pull the power cable before opening the case. Then ground yourself by touching bare metal on the chassis or wearing an anti-static wrist strap.
Which slots should I use for two RAM sticks?
Use the slot pair your motherboard manual specifies, which is often the second and fourth slots from the CPU on a four-slot board. Slot order varies by model, so check the manual's population table rather than assuming a layout.
How do I know the RAM is seated correctly?
The retaining latches should snap up and click, and the gold contacts should be nearly hidden inside the slot. If a latch stays open or the stick rocks, press down again with even pressure on both ends until it seats.
Will adding RAM make my PC faster?
More capacity helps when you run out of memory, which shows up as stuttering with many tabs or heavy apps. If your current RAM is never full, extra capacity does little. Speed gains depend on what your motherboard and CPU officially support.
Final Thoughts
The single most important takeaway is to follow your motherboard manual for memory type and slot order, then seat each stick firmly until the latches click. That combination prevents most no-boot and single-channel surprises.
Take the ten minutes to power down, ground yourself, and check the BIOS afterward. A careful install is a quiet one, and your system will simply show the new capacity and carry on.
